Welcome to the official website of Nanyang Huaye Explosion-proof Instrument Co., Ltd!
Service Hotline:0377-61613169 | E-mail: abc@huayex.com


BJZ series explosion-proof automatic greaser automatic oiler
The explosion-proof automatic greaser is an independent oil supply device that runs a small reducer according to the time stored in the microprocessor, drives the worm gear inside the pump, and sucks/sprays the grease in the container through the reciprocating motion of the vertical piston.
Classification:
Detailed introduction
1. Product Introduction
1.1 Product Overview
The explosion-proof automatic greaser is an independent oil supply device. It runs a small reducer according to the time stored in the microprocessor, drives the worm gear inside the pump, and sucks/sprays the grease in the container through the reciprocating motion of the vertical piston.
This product adopts an explosion-proof electrical device structure to ensure that electrical equipment can operate normally in a potentially explosive environment and prevent the ignition of surrounding explosive gases under abnormal conditions. Its circuits and components are all automatic oilers made based on the explosion-proof principle.
1.2 Product Structure

1.3 Product Features
1. ExibIICT4 Gb explosion-proof certification, suitable for Zone 1 and Zone 2, hazardous locations with explosive gas mixtures of IIA~IIC and temperature groups T1~T4.
2. Reliable grease supply, high working pressure (15bar), and remote installation.
3. Reusable: Just replace the grease bag and battery box for continuous use.
4. Simple operation: The display screen indicates detailed content and the button operation is simple.
5. The oil filling cycle (oil filling amount) is adjustable: half a month, 1, 2, 3, 6, 12 months, suitable for a wide range of equipment.
6. Test function: It can be used for various purposes such as debugging confirmation, rapid oil injection (clearing), pressure testing, etc.
7. Rich indication functions: end of oil filling cycle, power indication, fault indication, insufficient grease, all have independent indications and references.
8. Automatic locking function: It can prevent accidental button touch. Make the equipment run stably.
9. Easy to observe: transparent shell, easy to observe the grease bag capacity.
A. Small size, easy to install, can be installed at a distance, suitable for installation in narrow spaces.
1.4 Applicable objects
1. The space is narrow and can only be installed at a distance;
2. The situation where huge vibration occurs and the previous gas-type products are not suitable;
3. The situation where the oil injection nozzle should not be opened frequently;
4. The situation where frequent oil injection is required, but manual oil injection is not suitable;
5. The situation where oil injection can only be done after shutdown;
6. All industrial bearings that need grease injection;
2. Product specifications and parameters
| Specification | parameter |
| capacity | 125 beauty, 250 beauty |
| Pump Type | Vertical self-priming pump |
| Vertical self-priming pump |
ExibIICT4 Gb |
| Protection level |
IP55 |
| Oil filling cycle | Half a month, 1, 2, 3, 6, 12 months |
| Work Pressure | Up to 15 bar |
| Operating temperature range |
-15~65℃ |
| Battery | DC 4.5V alkaline battery pack |
| Mounting Thread | 3/8”PT male |
| Single oil injection volume | 0.34 ml per stroke (at 20°C) |
| Multi-point lubrication | Suitable for single point lubrication |
| Remote Installation | Maximum length: 3m (based on Φ6 pipe) |
| Dimensions | Φ91x 210mm (H) |
| Machine weight | 670 g (without oil bag) |
3. Operation Instructions
3.1 Panel Icon

3.2 Button Description
3.3 Display Description
3.4 Lubrication Cycle Comparison Table
| Bearing shaft diameter | 125ml grease pack | 250ml Grease Pack | ||
| cycle | Grease injection frequency | cycle | Grease injection frequency | |
|
166mm(6.50”) ~ 229mm(9.00”) |
Half a month | 48 times/day | ||
|
102mm(4.00”) ~ 165mm(6.50”) |
Half a month | 24 times/day | 1 month | 24 times/day |
|
90mm(3.50”) ~ 150mm(6.00”) |
1 month | 12 times/day | 2 months | 12 times/day |
|
77mm(3.00”) ~ 89mm(3.50”) |
2 months | 6 times/day | 3 months | 8 times/day |
|
65mm(2.50”) ~ 89mm(3.50”) |
3 months | 4 times/day | 6 months | 4 times/day |
|
50mm(2.00”) ~ 65mm(2.50”) |
6 months | 2 times/day | 12 months | 2 times/day |
|
25mm(1.00”) ~ 50mm(2.00”) |
12 months | 1 time/day | ||
Note: The oil injection amount per stroke of the oil injector is 0.34ml at 20℃. The amount of grease injection will be affected by factors such as temperature, air pressure, and grease concentration. If the average temperature is different, please select the appropriate oil injection cycle according to the actual situation on site.
4. Installation and debugging
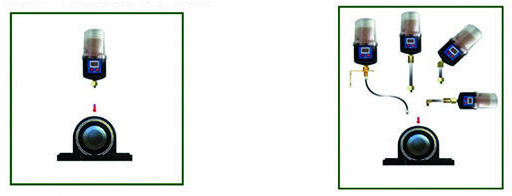
4.1 Installation methods
Direct installation and remote installation
4.1 Installation steps and precautions
1. Before installation, confirm whether the grease of the lubricator meets the lubrication requirements of the equipment;
2. Before installation, clean the dirt around the lubrication point, and use a manual grease gun to dredge the oil circuit if necessary;
3. During installation, each connection point needs to be sealed to prevent oil leakage;
4. If there are vibrations, overheating, unsafe operation locations, etc. during use, it is recommended to use remote installation.
4.2 Debugging
1. Long press the POWER button to turn on the machine and confirm that the display is normal;
2. Start the test mode to test whether the lubricator is operating and greasing normally. The test can be ended manually (refer to 3.2 button instructions);
3. Select the grease bag capacity and set the greasing cycle. When entering the locked state, the greaser will work normally according to the settings;
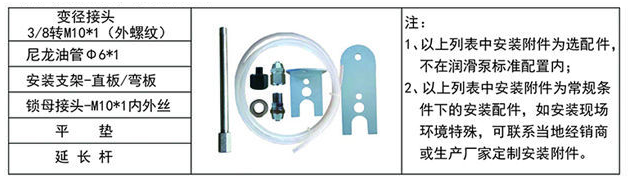
4.3 Remote installation accessories (optional)
5. Spare kit
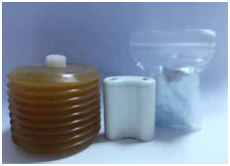
5.1 Spare kit description
1. The spare kit includes: grease pack (125ml or 250ml), battery pack (4.5V alkaline battery pack), and dust cover.
2. It is recommended to replace the grease pack and battery pack at the same time to ensure sufficient power.
5.2 Steps and precautions for replacing the kit
1. Before replacing, please make sure it is in the off state;
2. There is a spring in the top cover. Please pay attention to the elastic force when removing and installing the top cover;
3. After installing the new battery pack, rotate the battery pressing piece to press the battery pack firmly;
4. Before replacing the grease bag, press the grease bag to make a small amount of grease overflow from the outlet, and then tighten it to the interface;
5. After replacing the kit, perform the clear data operation (refer to 3.2), and then re-debug;
6. After debugging, put on the dust cover;
6. Fault and alarm
Causes of the phenomenon and treatment
The motor stall indicator lights up. Grease hardening, grease overflow, pipe blockage, pipe length, etc. will cause excessive back pressure, resulting in motor stall. Confirm the back pressure level;
You can use a manual grease gun to pressurize and unclog the pipe;
Shorten the length of the connecting pipe;
The indicator light flashes continuously. When the oil filling cycle ends, the battery is low, the motor stops or the grease is insufficient, the indicator light will flash continuously (frequency 1Hz). Please follow the instructions to check the equipment status;
(Refer to 3.2 Display Instructions)
7. Special warnings
1. Do not tamper with this product or the battery pack
2. Do not open the device during operation
3. Avoid impact on this product
4. Avoid excessive vibration (use remote installation to avoid vibration)
5. Do not immerse this product in water
6. When placing and installing this product, do not place it directly near a high temperature source (avoid temperatures exceeding 50°C)
7. Avoid corrosive environments, such as strong acids, strong alkalis, etc.
8. Product model

Key words:
* Note: Please be sure to fill in the information accurately and keep the communication unblocked. We will get in touch with you as soon as possible.
Nanyang Huaye Explosion Protected Instrument Co., Ltd.
Professional manufacturer of explosion-proof temperature meters and temperature sensors and suppliers of motor supporting instruments
Professional manufacturer of explosion-proof temperature instruments and temperature sensors, as well...
24-hour service hotline
Mobile:+86-15093007079 / +86-13838705322
Address: Middle Section of 3# Road, 2# Industrial Park, High-tech Zone, Nanyang City, Henan Province
E-mail:abc@huayex.com
Fax:+86-377-61613132

Copyright©Nanyang Huaye Explosion Protected Instrument Co., Ltd. This site already supports IPV6 Business License